9/30/08

Visual Studio .Net 3.5 Features

ASP.NET AJAX

New ListView and DataPager Controls

LINQ and other .NET Framework 3.5 Improvements

WCF Support for RSS, JSON, POX and Partial Trust

New Web Features in Visual Studio 2008

New Web Design Interface

JavaScript Debugging and Intellisense

Multi-targeting Support


.NET Framework 3.5 New Features

Faster .NET Framework execution

Base Class Library – New Class Additions

Language Integrated Query (LINQ)

1. Faster garbage collection

2. Smarter, faster NGen requiring smaller working set RAM

3. 64 bit client improvements

4. ThreadPool performance improvements

5. Security check caching during NGen

6. BigInteger, HashSet and DateTime2 types

7. NSA Suite ”B” and FIPs compliant cryptography

8. Lightweight Reader/Writer Lock Classes

9. Anonymous and Named Pipes IO Classes

10. Integration with Event Tracing for Windows

11. New Addin hosting model for extensibility

Deep integration of LINQ data-awareness into the programming languages and framework.

Workflow Enabled Services – Process and Messaging together

Web 2.0 Friendly and AJAX Enabled WCF Services

Visual Studio Developer Tools for WF, WCF and in Visual Studio “Orcas”

Using workflow to provide for durable and long-running services. New Tools, WF activities and new programming model classes have been added to simplify building workflow-enabled services using WF and WCF. This allows a .NET Framework developer to build business logic for a service using WF and expose messaging from that service using WCF. These improvements not only provide tools for this scenario but they reduce the amount of glue code that was previously required.

Ajax is a web development technique for making asynchronous exchanges of small amounts of data between browser and web service calls from the browser client script to the web server. A programming model is provided for building Ajax style web applications using WCF services. An HTTP programming model is also provided allowing for REST style web services.

Visual Studio”Orcas” has built in tools for web service authoring with WCF and for building workflow enabled software with WF. There are new project templates for WCF services, WF business logic, workflow enabled services, and AJAX services. The templates are conveniently set up to compile and run even before any custom code is added enabling .NET developers to get going quickly. There are also numerous other tools for developing with WF, WCF and WPF.

More WS-* Standards Support

RSS and ATOM Syndication API

Partial Trust Support for WCF Hosting

Implementation in WCF of the latest OASIS specifications Web Services Atomic Transaction (WS-AtomicTransaction) 1.1, WS-ReliableMessaging 1.1, WS-SecureCOnversation and Web Services Coordination (WS-Coordination) 1.1.

Applications built using WCF will be able to easily expose syndicated data which can be consumed by an RSS or ATOM reader.

Partial trust on the vlient is provided for ASMX parity focussing mainly on partially trusted WCF applications deployed through click-once. Support is provided for basic HTTP binding provided that the application runs in the Internet zone permissions and have granted the apropriate WebPermission. Secure communication is possible through transport security only. All other features are not available to partially trusted applications including hosting services, duplex communications, non-HTTP transports, WS-* protocols and any WF use.

Rules Data Improvements

Built-in WPF tools for Visual Studio “Orcas”

Additional WPF Features and Improved Performance

The rules engine in WF is improved to add support for C# 3.0 extension metods, and for operator overloading . Also the ”new” operator is added to compete the base set of expression types.

The Visual Studio designer for WPF was previously released as a CTP. It is not integrated into the development environment and is significantly improved.

WPF has smoother animations, faster startup and better overall performance. There are also new data types available for data binding with LINQ. Better integration support is now provided for with codename “WPF/E”.

9/11/08

Windows Service - Start Time from app.config, Running Windows Service daily

As for having the app.config data actually "start" the service, you can't really do this. Windows starts the service, or you start the service manually. There's no app.config setting you can put in there to tell the service to start itself.

So a good alternative would be to put in a timer in your service code, and have it pull out the value from the app.config, and run the code you want to run at a particular time when that timer runs out. To do this, you can put a date value in the app.config, and parse it into a datetime in your service. Once you parse it into the datetime, you can then calculate how long it will be until that time comes around, and start either a Thread.Sleep for that amount of time, or set up some kind of timer.


using System.Windows.Forms;


I know this because you're calling a non-parametrized constructor on Timer. Don't use that timer. Use System.Threading.Timer and construct it on your OnStart, while keeping it class level.


You could set a System.Threading.Timer to do the processing work, and have it set the timer each time you start the application. Something like this should work:

using System;
using System.Threading;
public static class Program
{
static void Main(string[] args)
{
// get today's date at 10:00 AM
DateTime tenAM = DateTime.Today.AddHours(10);

// if 10:00 AM has passed, get tomorrow at 10:00 AM
if (DateTime.Now > tenAM)
tenAM = tenAM.AddDays(1);

// calculate milliseconds until the next 10:00 AM.
int timeToFirstExecution = (int)tenAM.Subtract(DateTime.Now).TotalMilliseconds;

// calculate the number of milliseconds in 24 hours.
int timeBetweenCalls = (int)new TimeSpan(24, 0, 0).TotalMilliseconds;

// set the method to execute when the timer executes.
TimerCallback methodToExecute = ProcessFile;

// start the timer. The timer will execute "ProcessFile" when the number of seconds between now and
// the next 10:00 AM elapse. After that, it will execute every 24 hours.
System.Threading.Timer timer = new System.Threading.Timer(methodToExecute, null, timeToFirstExecution, timeBetweenCalls );

// Block the main thread forever. The timer will continue to execute.
Thread.Sleep(Timeout.Infinite);
}

public static void ProcessFile(object obj)
{
// do your processing here.
}
}


Oh, and you would just keep the service running constantly for this. Start the service and forget about it. It'll run your processing every 24 hours on it's own, and always at 10:00 AM, like clockwork.

Global.asax Asp.net


Introduction:

---------------------------------------------------------------------------------------------------


The Global.asax file (also known as the ASP.NET application file) is an optional file that is located in the application's root directory and is the ASP.NET counterpart of the Global.asa of ASP. This file exposes the application and session level events in ASP.NET and provides a gateway to all the application and the session level events in ASP.NET. This file can be used to implement the important application and session level events such as Application_Start, Application_End, Session_Start, Session_End, etc. This article provides an overview of the Global.asax file, the events stored in this file and how we can perform application wide tasks with the help of this file.


What is the Global.asax file?
-----------------------------

"The Global.asax file, also known as the ASP.NET application file, is an optional file that contains code for responding to application-level events raised by ASP.NET." The Global.asax file is parsed and dynamically compiled by ASP.NET into a .NET Framework class the first time any resource or URL within its application namespace is activated or requested. Whenever the application is requested for the first time, the Global.asax file is parsed and compiled to a class that extends the HttpApplication class. When the Global.asax file changes, the framework reboots the application and the Application_OnStart event is fired once again when the next request comes in. Note that the Global.asax file does not need recompilation if no changes have been made to it. There can be only one Global.asax file per application and it should be located in the application's root directory only.


Events in the Global.asax file
----------------------------------

The following are some of the important events in the Global.asax file.

· Application_Init

· Application_Start

· Session_Start

· Application_BeginRequest

· Application_EndRequest

· Application_AuthenticateRequest

· Application_Error

· Session_End

· Application_End

The purpose of these event handlers is discussed in this section below.

Application_Init

The Application_Init event is fired when an application initializes the first time.

Application_Start

The Application_Start event is fired the first time when an application starts.

Session_Start

The Session_Start event is fired the first time when a user’s session is started. This typically contains for session initialization logic code.

Application_BeginRequest

The Application_BeginRequest event is fired each time a new request comes in.

Application_EndRequest

The Application_EndRequest event is fired when the application terminates.

Application_AuthenticateRequest

The Application_AuthenticateRequest event indicates that a request is ready to be authenticated. If you are using Forms Authentication, this event can be used to check for the user's roles and rights.

Application_Error

The Application_Error event is fired when an unhandled error occurs within the application.

Session_End

The Session_End Event is fired whenever a single user Session ends or times out.

Application_End

The Application_End event is last event of its kind that is fired when the application ends or times out. It typically contains application cleanup logic.


Using the Global.asax file

--------------------------------


The following code sample shows how we can use the events in the Global.asax file to store values in the Application state and then retrieve them when necessary. The program stores an Application and a Session counter in the Application state to determine the number of times the application has been accessed and the number of users currently accessing the application.


Listing 1

using System;
using System.ComponentModel;
using System.Web;
using System.Web.SessionState;
public class Global : HttpApplication
{
protected void Application_Start(Object sender, EventArgs e)
{
Application["appCtr"] = 0;
Application["noOfUsers"] = 0;
}
protected void Application_BeginRequest(Object sender, EventArgs e)
{
Application.Lock();
Application["appCtr"] = (int) Application["appCtr"] + 1;
Application.UnLock();
}

protected void Session_Start(Object sender, EventArgs e)
{
Application.Lock();
Application["noOfUsers"] = (int) Application["noOfUsers"] + 1;
Application.UnLock();
}
// Code for other handlers
}

After storing the values in the Application state, they can be retrieved using the statements given in the code sample below.

Listing 2

Response.Write("This application has been accessed "+Application["appCtr"] + " times");
Response.Write("There are "+ Application["noOfUsers"] + " users accessing this application");


Radiobuttonlist with images

I looked on the newsgroups to see if anyone had posted anything about this, and i found a few dead-end posts which seemed to conclude that it couldn't be done.
i used a very simple approach that works well, and am posting it here for anyone looking to see how to do it. the requirements are to present a radio-button-list with images instead of just text.


string imageBankFolder = "/ImageBankFolder/Thumbnails/";
DataSet ds = new DB.ImageBank().Select(); // get your dataset from wherever
foreach(DataRow dr in ds.Tables[0].Rows)

this.RadioButtonList1.Items.Add(new ListItem(String.Format("", imageBankFolder + dr["ImageFile"].ToString()), dr["ImageID"].ToString()));


this displays the images only. note: firefox works fine with this, you can click on the image to select it, but IE6 requires you to actually click on the round radio button icon. to work around this, i included some text above the image, which sits beside the button, and it is more intuitive for the user to click the text or the radio icon then. to include some text above the image, try the following:

this.RadioButtonList1.Items.Add(new ListItem(String.Format("{1}
", imageBankFolder + dr["ImageFile"].ToString(), dr["Text"].ToString()), dr["ImageID"].ToString()));

hope this helps someone out there.


OR


foreach (ListItem item in RadioButtonList1.Items)
{
item.Attributes.CssStyle.Add("background-image", "url(radio.jpg)");
}


OR


RadioButtonList1.Items[0].Attributes.CssStyle.Add("background-image", "url(radio1.jpg)");

RadioButtonList1.Items[1].Attributes.CssStyle.Add("background-image", "url(radio2.jpg)");

RadioButtonList1.Items[2].Attributes.CssStyle.Add("background-image", "url(radio3.jpg)")


How to build Multi-Language Web Sites with ASP.NET 2.0

Introduction:

------------------------------------------------------------------------------------------------------

In order to reach international markets through the Internet, supporting different cultures through our applications is essential for being successful. The .NET Framework 2.0 as well as 1.x comes with an integrated infrastructure for creating international applications. Basically, the CLR supports a mechanism for packaging and deploying resources with any type of application. The CLR and the base class library of the .NET Framework come with several classes for managing and accessing resources in applications. These classes are located in the System.Resources and System.Globalization namespaces. Here we will explore the necessary details for working with resources in ASP.NET applications and for creating international ASP.NET applications based on embedded resources and the integrated localization support.

Assumptions:

This article assumes that you already know how to build web forms and to use controls and validation controls.

Localization and resource files:

Localization support in .Net Framework 2.0 in general and in ASP.Net 2.0 specifically become much more easier and brings fun during localization process. Usually resources are created for every culture the application should support. More specifically, each Web Form -Page- in your web site should have a resources for every culture -language- it should support. For example:

If you have a web form with name default.aspx and your web site support English, German and Arabic, then you should have 3 resource files for each culture. The CLR defines a behavior for finding culture-specific resources. With that said, every set of resources has to define a base name that is specified through the first part of the name of the resource file. The second part of the name defines the culture. If the culture portion in the name is not specified, the resources defined in the resource file are used as default resources. For example:

Your page name is default.aspx., you have 3 resource files as mentioned earlier, each one resource file should be named as:

default.aspx.en-US.resx, default.aspx.de-DE.resx and default.aspx.ar-EG.resx. Not here that we are using United States English, German's Gemran, and Egyptian's Arabic. You can use general English or general German or general Arabic like this:

default.aspx.en.resx, default.aspx.de.resx and default.aspx.ar.resx. Also you can use another specific culture like using Switzerland German culture this way: default.aspx.de-CH.resx. For list of supported cultures in .Net Framework return to
MSDN.

How to build Multi-Language Web Sites with ASP.NET 2.0 and Visual Studio.Net 2005:

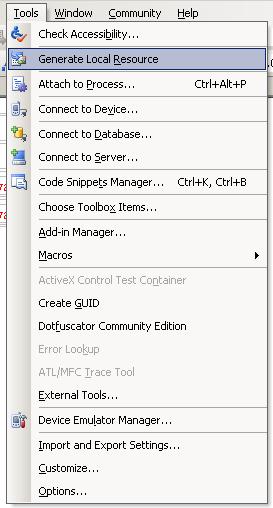
For localizing a page, just select Tools > Generate Local Resources. Visual Studio then generates a resource file in the App_LocalResources folder, which includes the values for every control of the page currently open in design view


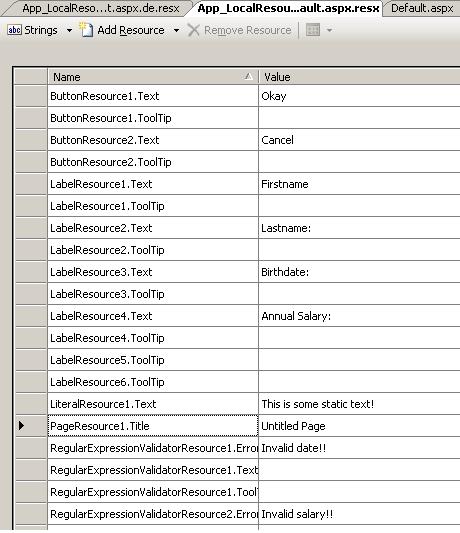
Visual Studio generates resources for several properties of each control. The resources are always prefixed with the name of the control and postfixed with the name of the property. Visual Studio automatically generates the default resources for the controls of the page only. You must add any further culture-specific resources manually by copying the generated resources and giving them the appropriate name (for example, default.aspx.ar-EG.resx) then translate the values.

The resource generation tool creates an entry for every property that is marked with the [Localizable] attribute in the control. Therefore, if you want to create a custom, localizable control, you have to mark all [Localizable] properties with this attribute.

Copying the resources created previously and renaming this copy to default.aspx.de.resx and default.aspx.ar-EG.resx adds the culture-specific resources for the German and Arabic cultures to the application.

Arabic Resources German Resources

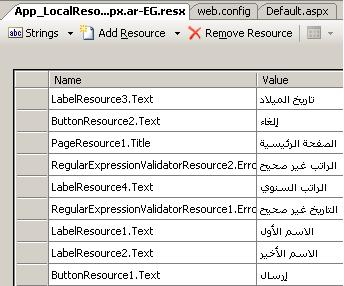
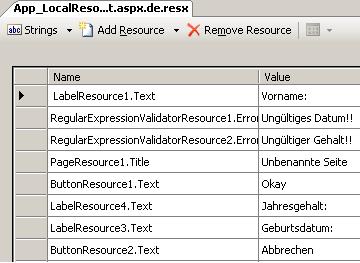
In addition to generating the resource file, Visual Studio has changed the page's source code. For every [Localizable] property of each control placed on the page, it has added a localization expression, as shown in the following code snippet:


Localization expressions are identified by the meta:resourceKey attribute of the tag.

The localization expression in the previous code is called implicit localization expression. Implicit localization expressions are something like shortcuts to resource keys included in the embedded resources for a page. They have to adhere to the naming conventions used by Visual Studio for generating the resources. Implicit localization expressions just specify the base resource key for the embedded resource without a property name. Property names are derived from the second part of the name. Note that you can use implicit localization expressions for [Localizable] properties only.

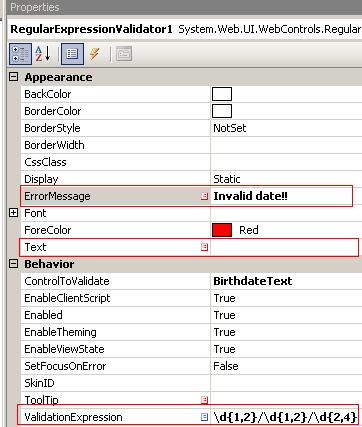
In the attached sample, there are RegularExpressionValidator controls. Although the RegularExpressionValidator control is included in the generated resources, the validation expression property is not included, because it is not marked with the [Localizable] attribute. But the validation of both the birth date and the annual salary has to happen based on the culture settings of the user browsing to the page, because US visitors want to add their birth date in the format they are used to (and the same goes for Germans and Arabs or any other visitors).

Therefore, you need to do some additional work before you are finished localizing the application. Basically, two ways for localizing the validation of those two text fields are available. The first one is to automatically generate the regular expression for the validation based on the CultureInfo object created for the user's culture. The second approach is to add an entry to the embedded resources for the validation expression. But we will go for the second approach to discuss how explicit localization expressions work. First, you have to add two new entries, containing the regular expression for validating the user's birth date and annual salary input, to the embedded resources. Afterward, you need to change the definition of those controls as follows (assuming that the resource entries are called RegularExpressionValidatorResource1.Validation and RegularExpressionValidator-Resource2.Validation):

ValidationExpression= '<%$ Resources: RegularExpressionValidatorResource1.Validation %>' meta:resourcekey="RegularExpressionValidatorResource1" />

You can probably see that the previous validator still contains some static text-in this case ErrorMessage. Don't worry about that. Because the validation control has a meta:resourcekey, the control will ignore the static text, and the runtime will get its data from the generated resources. As soon as a control has such a meta:resourcekey attribute, it ignores static text and reads all information from embedded, localized resources. In the case of the ValidationExpression, you have to use explicit localization expressions, because automatic localization is not provided for this property. The general format for explicit localization expressions follows this syntax:

<%$ Resources: [ApplicationKey, ] ResourceKey %>

The application key identifies shared application resources and therefore can be omitted when accessing local resources.

The following screen shot shows that localized properties are marked with special icons in the Properties window. The localization expressions themselves leverage the new expression engine included with ASP.NET 2.0.

Sharing Resources Between Pages:

Generating local resources for a single page might lead to a duplication of resource strings or other resource information. Therefore, it is definitely useful to share resources between pages through global resources. Global resources are placed in the App_GlobalResources folder. One good use for it for identifying system messages for each culture, or text direction setting, or common validation expressions for regular expression validators. For example, the validation expressions for date formats and number formats used earlier are definitely good candidates to be reused in several pages of the application, it is useful to put them into a global resource file. For this purpose you just need to add a new, global resource file and then add the values to those resources.

Now you have to adopt the explicit localization expression for the two validation controls. For this purpose you have to change the name and add the ApplicationKey parameter. Because we already named the global resource file ValidationResources.resx previously, this will be the value for the ApplicationKey property (without the .resx extension).

ValidationExpression='<%$ Resources:ValidationResources, DateFormat %>' meta:resourcekey="RegularExpressionValidatorResource1" />

Also you may need a way to specify the text direction in international applications, because some cultures read from left to right and others read from right to left. You can use a couple of controls in ASP.NET, such as the Panel control and the WebPart control, to deal with this. Therefore, it makes sense to define a property in either the global resources or the local resources for the text direction and to use explicit localization expressions for setting the direction property of these controls. For setting this property directly in the root element of your HTML file, you must use the runat="server" attribute to the tag itself, and then you can apply explicit localization expressions to it, as shown in the following code excerpt:

dir='<%$ Resources:ValidationResources, TextDirection %>' >

Setting Page Culture:

To set the page culture, you can set the Culture Property of the page and UICulture to use specific culture or set it to Auto to automatically Client Browser Language. Also you can make a default culture for your application by adding the following code to your web.config under system.web tag:

culture="ar-EG" uiCulture="ar-EG"/>

Or switching the culture programmatically by overriding Page.InitializeCulture Method:

protected override void InitializeCulture()
{

string culture = Request.Form["cmbCulture"];
if (string.IsNullOrEmpty(culture)) culture = "Auto";
//Use this
this.UICulture = culture;
this.Culture = culture;
//OR This
if (culture != "Auto")
{
System.Globalization.CultureInfo ci = new System.Globalization.CultureInfo(culture);
System.Threading.Thread.CurrentThread.CurrentCulture = ci;
System.Threading.Thread.CurrentThread.CurrentUICulture = ci;
}
base.InitializeCulture();

}
Protected Overrides Sub InitializeCulture()

Dim _culture As String = Request.Form("cmbCulture")
'Use this
If (String.IsNullOrEmpty(Culture)) Then
culture = "Auto"
Me.UICulture = _culture
Me.Culture = _culture
End If
'OR This
If (_culture <> "Auto") Then
Dim ci As New System.Globalization.CultureInfo(Culture)
System.Threading.Thread.CurrentThread.CurrentCulture = ci
System.Threading.Thread.CurrentThread.CurrentUICulture = ci
End If
MyBase.InitializeCulture()

End Sub

The above code is using a DropDownList with ID cmbCulture.

One Important thing about the InitializeCulture method, it is called very early in the page life cycle, before controls are created or properties are set for the page. Therefore, to read values that are passed to the page from controls, you must get them directly from the request using the Form collection. Just as we did above.

This is all, test it and have fun with localization support of ASP.NET 2.0


9/10/08

Two ASP.NET HttpHandler Image Hacks

Every HttpRequest that comes into ASP.NET is handled by an HttpHandler. It seems like a silly thing to say, but it's true. The IHttpHandler interface is the magic that makes it all happen. Every page you write is indirectly an HttpHandler. Every file that is requested is mapped to an HttpHandler. In this excerpt from Chapter 17, "Handlers and Modules," of ASP.NET 2.0 MVP Hacks and Tips you'll see two of the four specific HttpHandler hacks to get you started.

Discouraging Leeching Using an Image-Specific HttpHandler

Bandwidth leeching happens when you have an image hosted on your site and another site links directly to your image using an tag. The page serves from the other site, but the image is served from yours. Browsers typically include the name of the host that obtained the request. Images that are requested from your web server by a page hosted elsewhere will have a referrer header that doesn't match your site's URL.

Interestingly, the HTTP Referrer header field is actually misspelled in the spec, and has always been that way, as "referer" with a single "r." See http://www.w3.org/Protocols/rfc2616/rfc2616-sec14.html.

The static file handler in Listing 1 will check the current host with the referrer field of the current request. If they don't match, a "backoff.gif" file is returned no matter what file was originally requested! That means if you link to "scott.jpg" from your site, effectively leaching from me, you'll end up getting "backoff.gif" informing you and your readers that you were too lazy to just copy the file locally. It's a coarse technique, true, but these are crazy times on the open Internet and sometimes bandwidth leeches need a little reminder of the rules. The nice thing is that because it is a handler, it can be easily removed without recompiling the application by editing your web.config, so the functionality can be put up for a limited time.

The code is simple. Once ASP.NET and IIS are configured to handle image files, this handler will fire for every request image. First, the HTTP Referrer is checked to ensure that the site they are on is the same site requesting the image. If not, they receive the warning image. Otherwise, Response.WriteFile writes the image out to the client and no one notices the difference.

Listing 1: A leech-preventing HttpHandler for images
C#
using System.IO;
using System.Web;
using System.Globalization;

namespace MVPHacks
{
public class NoLeechImageHandler : IHttpHandler
{
public void ProcessRequest(System.Web.HttpContext ctx)
{
HttpRequest req = ctx.Request;
string path = req.PhysicalPath;
string extension = null;

if (req.UrlReferrer != null && req.UrlReferrer.Host.Length > 0)
{
if (
CultureInfo.InvariantCulture.CompareInfo.Compare(req.Url.Host,
req.UrlReferrer.Host, CompareOptions.IgnoreCase) != 0)
{
path = ctx.Server.MapPath("~/images/backoff.gif");
}
} string contentType = null;
extension = Path.GetExtension(path).ToLower();
switch (extension)
{
case ".gif":
contentType = "image/gif";
break;
case ".jpg":
contentType = "image/jpeg";
break;
case ".png":
contentType = "image/png";
break;
default:
throw new NotSupportedException("Unrecognized image type.");
} if (!File.Exists (path))
{
ctx.Response.Status = "Image not found";
ctx.Response.StatusCode = 404;
}
else
{
ctx.Response.StatusCode = 200;
ctx.Response.ContentType = contentType;
ctx.Response.WriteFile (path);
}
}

public bool IsReusable { get {return true; } }
}
}
VB
Namespace MVPHacks
Imports System.IO
Imports System.Web
Imports System.Globalization

Public Class NoLeechImageHandler
Inherits IHttpHandler

Public ReadOnly Property IsReusable As Boolean
Get
Return true
End Get
End Property

Public Sub ProcessRequest(ByVal ctx As System.Web.HttpContext)
Dim req As HttpRequest = ctx.Request
Dim path As String = req.PhysicalPath
Dim extension As String = Nothing
If ((Not (req.UrlReferrer) Is Nothing) _
AndAlso (req.UrlReferrer.Host.Length > 0)) Then
If (CultureInfo.InvariantCulture.CompareInfo.Compare(
req.Url.Host, req.UrlReferrer.Host,
CompareOptions.IgnoreCase) <> 0) Then
path = ctx.Server.MapPath("~/images/backoff.gif")
End If
End If
Dim contentType As String = Nothing
extension = Path.GetExtension(path).ToLower
Select Case (extension)
Case ".gif"
contentType = "image/gif"
Case ".jpg"
contentType = "image/jpeg"
Case ".png"
contentType = "image/png"
Case Else
Throw New NotSupportedException(
"Unrecognized image type.")
End Select
If Not File.Exists(path) Then
ctx.Response.Status = "Image not found"
ctx.Response.StatusCode = 404
Else
ctx.Response.StatusCode = 200
ctx.Response.ContentType = contentType
ctx.Response.WriteFile(path)
End If
End Sub
End Class
End Namespace

Associating a file extension with a particular HttpHandler is a two-step process. First, IIS needs to know which extensions are routed to ASP.NET's worker process by associating the extension with aspnet_isapi.dll within IIS's administration tool. Then, within your application's web.config, each extension is associated with an assembly's qualified name (QN) to a specific HttpHandler:


type="MVPHacks.NoLeechImageHandler, MVPHacks "/>


The configuration of the web.config matches the switch statement within the code, so unless you associate an extension that isn't handled in the switch, you'll never throw the exception within Listing 1. This handler could be extended to handle other kinds of illicit leaching, including PDF or any other file that you feel is being stolen from your website.


Compositing Images with an HttpHandler

Recently, I had a back-end black-box system that was sending me two images that were Base64 encoded — that is, binary data encoded as a string, within an XML response. The images were of the front and back of a check. However, the requirement from the client was to show a single composite check image in the user's browser with the front image stacked on top of the back image with a single HTTP GET request. Of course, it has to be secure because this is a check we're talking about, so no writing to temp files!

Here's my solution, implemented as an HttpHandler, so the HTML would include something like the following:

The checkimage.ashx endpoint could be configured in the application's web.config HttpHandlers section, or presented as a small text file like this:

<% @ webhandler language="C#" class="MVPHacks.ExampleCompositingImageHandler" %>

The point is to make sure that ASP.NET knows how to map a request to that request's handler. The simple one-line ashx file exists for one purpose and one purpose only — to be an endpoint, and in existing, to provide a mapping. Most folks prefer to do their mapping within the web.config because everything is centralized and easily changed. Others find this frustrating because their first instinct is to assume that every file that appears in the browser's address bar corresponds to a file on disk. Neither way is better than the other but I prefer the flexibility of the web.config method.

Listing 2 has a few details snipped out that are specific to the request I made to the back-end mainframe system. I've replaced that with the simple request/response model to imply an XML Web Services method. The check images are in the res.ImageFront and res.ImageBack properties as byte arrays.

Listing 2: An image compositing HttpHandler
C#
public class ExampleCompositingImageHandler : IHttpHandler
{
public SomeCheckImageHandler(){}

public void ProcessRequest(HttpContext context)
{
context.Response.ContentType = "image/jpeg";
//some stuff snipped
GetCheckImageRequest req = new GetCheckImageRequest();
//some stuff snipped, get the params from the QueryString
GetCheckImageResponse res = banking.GetCheckImage(req);
//some stuff snipped
if (res.ImageBack != null)
{
//merge them into one image
using(MemoryStream m = new MemoryStream(res.BackImageBytes))
using(Image backImage = System.Drawing.Image.FromStream(m))
using(MemoryStream m2 = new MemoryStream(res.BrontImageBytes))
using(Image frontImage = System.Drawing.Image.FromStream(m2))
using(Bitmap compositeImage = new
Bitmap(frontImage.Width,frontImage.Height+backImage.Height))
using(Graphics compositeGraphics = Graphics.FromImage(compositeImage))
{
compositeGraphics.CompositingMode = CompositingMode.SourceCopy;
compositeGraphics.DrawImageUnscaled(frontImage,0,0);
compositeGraphics.DrawImageUnscaled(backImage,0,frontImage.Height);
compositeImage.Save(context.Response.OutputStream,
ImageFormat.Jpeg);
}
}
else //just show the front, we've got no back
{
using(MemoryStream m = new MemoryStream(frontImageBytes))
using(Image image = System.Drawing.Image.FromStream(m))
{
image.Save(context.Response.OutputStream, ImageFormat.Jpeg);
}
}
}
}
VB
Public Class ExampleCompositingImageHandler
Inherits IHttpHandler

Public Sub ProcessRequest(ByVal context As HttpContext)
context.Response.ContentType = "image/jpeg"
'some stuff snipped
Dim req As GetCheckImageRequest = New GetCheckImageRequest
'some stuff snipped, get the params from the QueryString
Dim res As GetCheckImageResponse = banking.GetCheckImage(req)
'some stuff snipped
If (Not (res.ImageBack) Is Nothing) Then
'merge them into one image
Using m As MemoryStream = New MemoryStream(res.BackImageBytes)
Using backImage As Image = System.Drawing.Image.FromStream(m)
Using m2 As MemoryStream = New MemoryStream(res.BrontImageBytes)
Using frontImage As Image = System.Drawing.Image.FromStream(m2)
Using compositeImage As Bitmap =
New Bitmap(frontImage.Width, (frontImage.Height + backImage.Height))
Using compositeGraphics As Graphics =
Graphics.FromImage(compositeImage)
compositeGraphics.CompositingMode = CompositingMode.SourceCopy
compositeGraphics.DrawImageUnscaled(frontImage, 0, 0)
compositeGraphics.DrawImageUnscaled(backImage, 0, frontImage.Height)
compositeImage.Save(context.Response.OutputStream, ImageFormat.Jpeg)
End Using
End Using
End Using
End Using
End Using
End Using
Else
Dim m As MemoryStream = New MemoryStream(frontImageBytes)
Dim image As Image = System.Drawing.Image.FromStream(m)
image.Save(context.Response.OutputStream, ImageFormat.Jpeg)
End If
End Sub
End Class

Note a few interesting things about this example. First, the manipulation of streams enables you to save the contents of the stream directly to the response object, as in this line:

image.Save(context.Response.OutputStream, ImageFormat.Jpeg)

Another thing of note is my potentially excessive use of the using statement. Many classes within the .NET Base Class Library are disposable. That is, they are thin wrappers around physical resources that really should be released as soon as you are done with them. Many of the classes within GDI+, the Graphics Device Interface, hold on to unmanaged resources. Rather than wait for the garbage collector to clean up after me, I prefer to be very explicit and dispose of these resources directly. The using statement provides determinism, and while it doesn't release the object reference itself, it does promise to clean up the resources that object manages. After an object is disposed, you mustn't use it. Some may call this stylistic and may disagree, but I feel that is deterministic and a best practice.

The last interesting thing to note is that in the interest of robustness this handler draws the front check image by itself if the back is not returned. This allows more flexibility and renders the hack reusable.

LDAP Access Control for ASP.NET

Introduction

This is an example of how to build an ASP.Net LDAP authentication application using ADAM.

Microsoft's ADAM (Active Directory Application Mode) is a popular LDAP server for application developers. It's free, easy to install, and can "grow up" into full-blown Active Directory. It is also a simple to use if your application is running in a Windows-only environment with NTLM authentication.

However, many LDAP applications have clients that run on operating systems other than Windows and Windows clients that are not on the same domain as the server. When ADAM is configured for those types of scenarios it becomes harder to use because it requires a few additional administration settings and some extra code to connect to it.

This article describes how to configure ADAM for regular LDAP communication and build a boilerplate ASP.Net application on top of it. We will use an LDAP client which does not use NTLM authentication, to show that this can be done with any client and on any platform.

At the end of this tutorial you will have an ASP.Net application capable of authenticating users against a directory,

creating new users,

and displaying the credentials of the active user.

NOTE There are subtle differences in how ADAM behaves on Windows Server that is part of a domain, a Windows Server that is not on a domain, and Windows XP. This sample is based on ADAM running on Windows XP. On Windows Server additional steps may be necessary to make this sample work.

Prerequisites

In order to run this sample you will need:

Creating an ADAM Directory Instance

After downloading and installing the prerequisites above, create an ADAM directory instance using all of the default settings. Start the ADAM setup wizard by clicking Start->All Programs->ADAM->Create an ADAM instance.

Create a new instance.

The instance name is arbitrary.

The default LDAP port is 389. If this is already taken by another instance we can just pick a different one.

Create a partition for your application data. By default ADAM will not create a partition because applications are expected to do that on their own but our sample doesn't have that need.

Select the installation directory.

Again, to simplify configuration use Network Service account as the service account.

Add yourself as the initial administrator of the LDAP Instance.

Select which LDIF files to import. These files contain schema definitions and describe what kind of data you will be able to store in your directory instance. You can import more LDIF files later and for now all we need is user information.


Click next on the summary page and sit back while ADAM sets up your LDAP instance.

When this process is done you will have an empty directory with the MS-User schema installed. You will be able to connect to it only with ADSI and only as yourself. Next, we'll put some users into the directory, and after that we'll use those users for authentication into the directory itself.

Intermission

At this point we have to make a configuration change in order to loosen up some locked-down default settings: we will need to enable user password changes over non-SSL connections.

Why do we need to do this? Because we want to create users in ADAM, we want to give those users passwords, and we don't want to set up SSL. If we wanted ADAM to use Windows principals (such as domain users) for authentication to the directory then we would not have to do make this change, since ADAM would not be storing passwords (or users, for that matter). But since the very point of this exercise is to decouple ourselves from Active Directory and NTLM, and because we want to avoid the extra complexity of setting up SSL, we will disable the security setting which prevents password operations over non-SSL channels.

While a pain in development and prototyping environments, this secure configuration is something that you should use in production servers. In those cases you should configure SSL instead of disabling this setting. As a bonus, however, this gives us a chance to introduce one of the indispensable ADAM tools: ADSIEdit.

To run ADSIEdit click Start->All Programs->ADAM->ADAM ADSI Edit. You'll see an empty MMC console:

Right-click on ADAM ADSI Edit and select Connect to... Select the Configuration naming context, give this connection a helpful name and click OK.

ADAM uses a separate naming context (also called a "partition") to store settings for that ADAM service instance. Settings here are stored using the exact same mechanism that users, organizational units, computers and groups will be stored in the other partition we created a few minutes ago.

The setting we are looking for is in the object named CN=Directory Service,CN=Windows NT,CN=Services,CN=Configuration,CN={Configuration Naming Context GUID}. The exact name will vary between ADAM instances, but it's always in the same location.

Right-click on the object named CN=Directory Service and click Properties. You are now looking at all of the attributes of the Directory Service object. The attribute in which we are interested is called dsHeuristics. Contrary to its name, this attribute stores security policy, not store heuristics. Change the value of this attribute to 0000000001001 by selecting it, clicking Edit, typing (or pasting in the value 0000000001001) and clicking OK twice.

Now we have modified the configuration of our ADAM directory service instance so that we can give passwords to the users which we are about to create. Let's move on!

Creating new ADAM users

At this point only you can log on to your directory instance, and because your user account is a Windows account

  1. ADAM won't let you use your network credentials to log on over the generic LDAP interface without SSL and
  2. you wouldn't want to use your network credentials without SSL anyway because someone could sniff them, compromising not just your directory but also any network resources to which you have access.

We will use use ADSIEdit to create two new users. The first user will be the intital administrator, and the second user will be the service account for the ASP.Net application.

Follow the same steps as above to connect to the directory instance, but this time we will connect to your new naming context (cn=Sandbox,dc=ITOrg) instead of the Configuration naming context. Note that we are still connecting as the current user, i.e. via NTLM as a Windows user.

Now we need to create a container to store our new (and future) users. Navigate to the CN=Sandbox,DC=ITOrg container, right-click on it and select New->Object... Select container and click Next.

Use the name People. Click Next and Finish to create the container.

Next, navigate to the CN=People container, right-click on it and select New->Object... Select user and click Next.

Specify a cn (common name) for your soon-to-be administrator. I used the name superuser.

Then click Next and Finish to create the user.

NOTE By default on Windows Server when ADAM users are created they are disabled. To enable a user, change the value of its msDS-UserAccountDisabled attribute to false.

At this point superuser is not very super. She has no permissions at all in the directory and we have not given her a password so she can't even log in. Let's fix the password problem first. Right-click on this user and click Reset Password...

Click OK. Now our superuser can log in, but can't see or do anything. Let's give her some rights by adding her to the Administrators role, which is in the CN=Roles container.

Right-click on CN=Administrators and select Properties. Scroll to the member attribute and edit it. You'll see the security principal picker. There are two things of note here:

  1. You can add two types of users - Windows and ADAM
  2. The Administrators group from the Configuration naming context has already been added to this group. For homework, go back to the Configuration naming context and see who is in the Administrators group there.

Click Add ADAM Account... and enter the dn of our superuser (cn=superuser,cn=People,cn=Sandbox,dc=ITOrg)

Next, we will repeat the steps for creating a user to create our service account user. Instead of using superuser, we use ServiceAccount as the user's cn with password p@ssw0rd. Note that we are using the service account user to add new entries in our demo, so we need to add her to the administrative group as well.

Voila! We now have an LDAP user with administrative rights who can bind to our directory using plain text passwords and a service account user who can create new users.

Authenticating with LDAP Client.Net

Since we now have a directory which can be accessed by any LDAP v3 client, let's do just that. We have built a boilerplate ASP.Net application that authenticates using Forms Authentication.

NOTE Forms Authentication is a platform feature of ASP.Net that simplifies building an application with restricted access to selected resources. Specific knowledge of Forms Authentication is not required to follow the remainder of this article (the link provided above is a good starting point for those who want to know more).

There are two tasks required to determine if a user is allowed to access a resource using Forms Authentication

  1. Verify that user name and password entered are correct
  2. Verify that user belongs to a role that has access to the desired resource

We will use LDAP Client.Net to perform these tasks. The Authenticate method below validates the user's credentials.

    private bool Authenticate(string username, string password)
{
bool authenticated = false;
Instantiate LDAP Client.Net.
        using (LdapServices.Ldap.Client client = new LdapServices.Ldap.Client())
{
try
{
// Connect to the directory as the user who is trying to
// authenticate. If this fails we know the username
// and/or password is incorrect.
LdapConnectionConfigurationSection config = LdapConnectionConfigurationSection.Current;
Connect to the directory using the credentials we are trying to authenticate.
                client.Connect(config.Server, config.Port, username, password);

// Force a re-fetch of the user's role information.
LdapRoleCache.Current.Remove(username);

authenticated = true;
}
catch (LdapException)
{
An LdapException is thrown if authentication fails using the given username and password.
                authenticated = false;
}
}

return authenticated;
}

Assuming that the user's credentials have been validated, we need to check which roles the user belong to. The GetRolesForUser method below accomplishes this task.

    private string[] GetRolesForUser(string username)
{
string[] roles = LdapRoleCache.Current[username];

if (roles == null)
{
// Use the LDAP connection information defined in web.config to
// retrieve the role membership information for this user.
using (LdapServices.Ldap.Client client = new LdapServices.Ldap.Client())
{
LdapConnectionConfigurationSection config = LdapConnectionConfigurationSection.Current;
client.Connect(config.Server, config.Port, config.User, config.Password);
Get all directory entries whose distinguishedName matches our username. There should only be one.
                LdapServices.Ldap.EntryCollection userEntries = client.Search(
config.BaseDn, "distinguishedName=" + username);

if (userEntries.Count == 1)
{
// Now retrieve the roles to which this user belongs and
// store them in the Application object.

The memberof attribute contains a collection of groups the entry belongs to. Each group is considered to be a role.
                    // We treat the memberof attribute as the collection of
// roles to which this user belongs.
LdapServices.Ldap.Attribute memberOf = userEntries[0].Attributes["memberof"];

// Copy the values from the memberof attribute into a string
// array.
roles = new string[memberOf.Values.Count];
for (int i = 0; i < memberOf.Values.Count; i++)
{
string adamGroupName = memberOf.Values[i].StringValue;

// Roles cannot contain commas in ASP.Net, so we are
// mapping commas to periods. The cache contains the
// original role names so we need to transform them
// before handing them off to ASP.Net.
roles[i] = adamGroupName.Replace(',', '.');
}

// Save the user's roles in our cache. We will access this
// cache later during the Application-level
// AuthenticateRequest event.
LdapRoleCache.Current[username] = roles;
}
}
}

// If we could not retrieve the roles for this user then return an
// empty array, indicating that the user is not a member of any roles.
if (roles == null)
{
roles = new string[] { };
}

return roles;
}

Creating users with LDAP Client.Net

The example above shows how to read data from our directory server. In this example, we will use LDAP Client.Net to create new users, modify their password attribute and add them to roles.

The createButton_Click method below is the event handler for creating a new user in our sample application.

    protected void createButton_Click(object sender, EventArgs e)
{
try
{
LdapConnectionConfigurationSection config = LdapConnectionConfigurationSection.Current;
using (LdapServices.Ldap.Client client = new LdapServices.Ldap.Client())
{
client.Connect(config.Server, config.Port, config.User, config.Password);

// Create the user.
A NameValueCollection is used to specify the user's attributes. Each entry in this collection corresponds to a single attribute.
                NameValueCollection attributes = new NameValueCollection();
attributes.Add("objectClass", "user");
string userDn = "cn=" + cnTextBox.Text + "," + config.NewUsersContainerDn;
The AddNewEntry method creates a new user with the specified attributes.
                LdapServices.Ldap.Entry newUser = client.AddNewEntry(userDn, attributes);

An alternative way to add attributes to an entry is through its Attributes property.
                newUser.Attributes.Add("userPassword", passwordTextBox.Text);

// Add the user to each specified role.
foreach (ListItem roleListItem in rolesCheckBoxList.Items)
{
if (roleListItem.Selected)
{
The implementation of AddUserToRole is provided below.
                        AddUserToRole(client, config.BaseDn, roleListItem.Value, userDn);
}
}
}

this.cnTextBox.Text = string.Empty;
this.rolesCheckBoxList.Items.Clear();
this.messageLabel.Text = "User created.";
this.messageLabel.Visible = true;
}
catch (LdapException ex)
{
this.messageLabel.Text = ex.ToString();
this.messageLabel.Visible = true;
}
}
The AddUserToRole method factors out the code for adding a user to a role.
    private void AddUserToRole(LdapServices.Ldap.Client client, string baseDn, string roleDn, string userDn)
{
The user's memberof attribute is read-only, so we have to add the user to the role's member attribute.
        LdapServices.Ldap.EntryCollection roles = client.Search(baseDn, "distinguishedName=" + roleDn);
LdapServices.Ldap.AttributeCollection roleAttributes = roles[0].Attributes;
LdapServices.Ldap.Attribute memberAttribute = roleAttributes["member"];
If the member attribute exists then we will add the user to it. Otherwise we have to create the attribute.
        if (memberAttribute != null)
{
memberAttribute.Values.Add(userDn);
}
else
{
roleAttributes.Add("member", userDn);
}
}


Welcome