7/28/09

Object Initializers and Collection Initializers

New C# Language Feature: Automatic Properties

If you are a C# developer today, you are probably quite used to writing classes with basic properties like the code-snippet below:

public class Person {

private string _firstName;
private string
_lastName;
private int
_age;

public string
FirstName {

get {
return _firstName;
}
set {
_firstName
= value;
}
}

public string LastName {

get {
return _lastName;
}
set {
_lastName
= value;
}
}

public int Age {

get {
return _age;
}
set {
_age
= value;
}
}
}

Note about that we aren't actually adding any logic in the getters/setters of our properties - instead we just get/set the value directly to a field. This begs the question - then why not just use fields instead of properties? Well - there are a lot of downsides to exposing public fields. Two of the big problems are: 1) you can't easily databind against fields, and 2) if you expose public fields from your classes you can't later change them to properties (for example: to add validation logic to the setters) without recompiling any assemblies compiled against the old class.

The new C# compiler that ships in "Orcas" provides an elegant way to make your code more concise while still retaining the flexibility of properties using a new language feature called "automatic properties". Automatic properties allow you to avoid having to manually declare a private field and write the get/set logic -- instead the compiler can automate creating the private field and the default get/set operations for you.

For example, using automatic properties I can now re-write the code above to just be:

public class Person {

public string FirstName {
get; set;
}

public string LastName {
get; set;
}

public int Age {
get; set;
}
}

Or If I want to be really terse, I can collapse the whitespace even further like so:

public class Person {
public string FirstName { get; set; }
public string LastName { get; set; }
public int Age { get; set; }
}

When the C# "Orcas" compiler encounters an empty get/set property implementation like above, it will now automatically generate a private field for you within your class, and implement a public getter and setter property implementation to it. The benefit of this is that from a type-contract perspective, the class looks exactly like it did with our first (more verbose) implementation above. This means that -- unlike public fields -- I can in the future add validation logic within my property setter implementation without having to change any external component that references my class.

Bart De Smet has a great write-up on what happens under the covers when using automatic properties with the March CTP release of "Orcas". You can read his excellent blog post on it here.

New C# and VB Language Feature: Object Initializers

Types within the .NET Framework rely heavily on the use of properties. When instantiating and using new classes, it is very common to write code like below:

Person person = new Person();
person.FirstName = "Rambhopal";
person.LastName = "Reddy";
person.Age = 30;

Have you ever wanted to make this more concise (and maybe fit on one line)? With the C# and VB "Orcas" compilers you can now take advantage of a great "syntactic sugar" language feature called "object Initializers" that allows you to-do this and re-write the above code like so:

Person person = new Person { FirstName="Rambhopal", LastName="Reddy", Age=30 };

The compiler will then automatically generate the appropriate property setter code that preserves the same semantic meaning as the previous (more verbose) code sample above.

In addition to setting simple property values when initializing a type, the object initializer feature allows us to optionally set more complex nested property types. For example, assume each Person type we defined above also has a property called "Address" of type "Address". We could then write the below code to create a new "Person" object and set its properties like so:

Person person = new Person {
FirstName
= "Rambhopal",
LastName
= "Reddy"
Age = 30,
Address
= new Address {
Street
= "India",
City
= "Hyderabad",
State
= "AP",
Zip
= 500045
}
}
;

Bart De Smet again has a great write-up on what happens under the covers when using object initializers with the March CTP release of "Orcas". You can read his excellent post on it here.

New C# and VB Language Feature: Collection Initializers

Object Initializers are great, and make it much easier to concisely add objects to collections. For example, if I wanted to add three people to a generics-based List collection of type "Person", I could write the below code:

List people = new List();

people.Add( new Person { FirstName = "Rambhopal", LastName = "Reddy", Age = 30 } );
people.Add( new Person { FirstName = "Bill", LastName = "Gates", Age = 50 } );
people.Add( new Person { FirstName = "Susanne", LastName = "Guthrie", Age = 32 } );

Using the new Object Initializer feature alone saved 12 extra lines of code with this sample versus what I'd need to type with the C# 2.0 compiler.

The C# and VB "Orcas" compilers allow us to go even further, though, and also now support "collection initializers" that allow us to avoid having multiple Add statements, and save even further keystrokes:

List people = new List {
new Person { FirstName = "Rambhopal", LastName = "Reddy", Age = 30 },
new Person { FirstName = "Bill", LastName = "Gates", Age = 50 },
new Person { FirstName = "Susanne", LastName = "Guthrie", Age = 32 }
}
;

When the compiler encounters the above syntax, it will automatically generate the collection insert code like the previous sample for us.

Summary:

As developers we now have a much more concise way to define objects, initialize them, and add them to collections. At runtime, the semantics will be exactly the same as with today's longer syntax (so you don't need to worry about behavior changes). But now you don't need to type as much, and your code can be more crisp and concise.

In the near future I'll do additional blog posts that examine even more "Orcas" language improvements including Extension Methods, Lambdas, and Anonymous Types. I'll then do a deep dive into LINQ, and show how it takes advantage of all of these features to provide a really elegant way to query and interact with data.


Extension Methods

New to .NET 3.5 are a very powerful new paradigm called Extension Methods. Extension Methods, in a nutshell, are a way to extend the functionality of additional classes--adding new Methods to existing classes for the purpose of augmenting capability. The easiest way to demonstrate this is to show you a great example...

namespace ExtensionMethods
{
public static class StringExtensionMethods
{
public static bool IsNumeric(this string str)
{
try
{
int i = int.Parse(str);
return true;
}
catch
{
}
return false;
}
}
}

C#, as many of you know, lacks the built in VB.NET function, IsNumeric. (By the way, I can name a few things wrong with this particular extension method--so only use this example for the How-To of Extension Methods, not synthesizing IsNumeric) This extension Method extends the type string (the keyword "this" in the method signature is used to define what this method extends). With this newly written function, you can determine if a string is numeric by running code like this:

string s = "someValue";
bool bs = s.IsNumeric();
// bs is false;

string i = "7";
bool bi = i.IsNumeric();
// bi is true;

Now--as you may know, .NET strings do not intrinsically have a method IsNumeric() on them--this is our new Extension Method in action. In Visual Studio, you'll get intellisense if everything's set up right. Here's the rules you need to follow...

  1. All Extension Methods need to be defined in a static class
  2. All Extension Methods need to be defined as a static method.
  3. All Extension Methods need to take at least one parameter defined as follows:
    this (keyword) string (type) parameterName
    Where the type is whatever type that you wish to extend.
  4. The "this" parameter needs to be the first parameter. All other parameters are optional--and must follow "this".

Also I recommend the following points...

  1. Extension Methods adds complexity to your project and more importantly your IDE must parse these--don't go extension method crazy.
  2. Extension Methods should be extensions only. It's not advisable to define them in commonly used NameSpaces such as "System". That could be bad...
  3. If you're writing too many extension methods--maybe it's time to write a custom class that inherits from that data type, No?

A powerful tool, they are--extend the .NET framework they can. Enjoy them you must.

Also, technically, you can use 'em in .NET 2.0--but its a lot more work.
http://msdn.microsoft.com/en-us/magazine/cc163317.aspx#S7

http://msdn.microsoft.com/en-us/library/bb383977.aspx


Local Type Inference

he focus of this article will be on highlighting the local type inference feature that has been added to C# 3.0 and Visual Basic 9.0 languages. You'll touch on what it is, the syntax behind it, and why it is relevant to understand. You'll also touch on some examples of invalid uses because it can be just as helpful to examine what it is not to get a grasp on the concept.

Local Type Inference Defined

Local type inference is a language feature that allows you to define variables and use them without worrying about their true type. Local type inference is also interchangeably known as implicitly typed local variables. The burden is put on the respective language compiler to determine the type of a variable by inferring it from the expression assigned to the variable. The result is type safety while allowing you to write more relaxed code, which is required to support Language Integrated Query (LINQ).

Based on the description and a first glance of code, it is very easy to mistake type inference to be similar to defining everything as a type object or use of variants, which is heavily used in Visual Basic 6.0. This is entirely untrue and not what type inference is about. Type inferred variables are strongly typed. The type cannot be changed once it is assigned as could be done with a variant type so it does not involve any casting operations or the resulting performance implications. A strong type is assigned, but simply done so by the compiler based on the results of the expression assigned to the variable. The net effect is the true type isn't as readily apparent when reading code, but the Visual Studio IDE will tell you the type assigned along with the GetType() method will return a strong type at runtime.

There may be temptation over time to get lazy and let the compiler do the work for you by using type inference across the board. However, this is where the local part of local type inference comes into play. Type inference can only be used within a local scope where its type can be inferred by the expression assignment. Type inference cannot be applied to any of the following:

  • Cannot be a part of a member property declaration on a class, struct, or interface
  • Cannot be used in a parameter list on a method
  • Cannot be a return type for a method
  • Cannot be defined without a right hand assignment expression
  • Cannot reassign to be a different type once type has been inferred

Local Type Inference in C# 3.0

C# 3.0 implements local type inference through the var keyword in place of a specific type in a variable declaration.

The sample code below demonstrates the syntax for local type inference in C#. I created a new Windows console project to hold the code. Visual Studio 2008 Beta 2 was used to create the examples contained within.


namespace CodeGuru.TypeInference
{
class Program
{
static void Main(string[] args)
{
int a = 5;
var b = a; // int
var x = 5.5M; // double
var s = "string"; // string
var l = s.Length; // int

Console.WriteLine("value of b is {0} and type is {1}",
b, b.GetType().ToString());
Console.WriteLine("type of x is {0}", x.GetType().ToString());
Console.WriteLine("type of s is {0}", s.GetType().ToString());
Console.WriteLine("type of l is {0}", l.GetType().ToString());

Console.ReadLine();
}
}
)

It can be just as useful at times to look at examples where something does not apply. The following sample C# code demonstrates situations in which local type inference cannot be used. The code that is listed below will result in six different compile errors based on invalid usage and intentionally will not compile.

namespace CodeGuru.TypeInference
{
class Program
{
var test = "invalid use"; // invalid in member declaration

// Invalid as parameter
public void TryAsParameter(var parm)
{
}

// Invalid as return type
public var TryAsReturnType()
{
return "invalid use";
}

public void TryInvalidLocalUse()
{
var local1; // must be initialized
var local2 = null; // can't infer type from null

var local3 = 5; // valid use
local3 = "change type"; // can't change type
}
}


}

Local Type Inference in Visual Basic 9.0


Using local type inference in Visual Basic is more likely to be
misleading because it can appear as if it matches the behavior of Option Strict Off. As with C#, you still get a strong type despite the appearances. The syntax in Visual Basic is to omit the As Type part of the variable declaration. This will work just fine with Option Strict On and it is encouraged to continue use of Option Strict On to ensure variant types are not allowed and avoids the undesired boxing and unboxing.


Visual Basic allows you to turn local type inference on and off. There is Option Infer On and Option Infer Off that will enable or disable local type inference respectively. It is on by default.


The sample code below will demonstrate the syntax for local type inference in Visual Basic.


Option Strict On

Module Module1

Sub Main()

Dim As Integer = 5
Dim b = a ' int
Dim x = 5.5 ' double
Dim s = "string" ' string
Dim l = s.Length() ' int

Console.WriteLine("value of b is {0} and type is {1}", b, _
b.GetType().ToString())
Console.WriteLine("type of x is {0}",
x.GetType().ToString())
Console.WriteLine("type of s is {0}",
s.GetType().ToString())
Console.WriteLine("type of l is {0}",
l.GetType().ToString())

Console.ReadLine()

End Sub

End Module


As with the C# example, it can be just as beneficial to demonstrate
where local type inference cannot be used. The following sample code
demonstrates invalid attempts at using local type inference in Visual
Basic 9.0. It is important to note this code will not compile.


Module Module1

Dim test = "invalid use" ' invalid in member declaration

' Invalid as parameter
Sub TryAsParameter(ByVal parm)
End Sub


Sub Main()
Dim local ' must be initialized

Dim local3 = 5 ' valid use
local3 = "change type" ' cannot change type
End Sub

End Module


Summary


This article covered the local type inference language feature. You
examined what it is along with the syntax using examples of how it can
and cannot be used. Type inference is one of the language features
along with extension methods, partial methods, and others that enable
Language Integrated Queries (LINQ) to be possible, so it is important
to understand how type inference works and what it is not.

Read Data From an Excel File in ASP.NET

In this article, we will see how to display data from an Excel spreadsheet using ASP.NET. We will connect to a Microsoft Excel workbook using the OLEDB.NET data provider, extract data and then display the data in a GridView. Let us get started.
Step 1: Open Visual Studio > File > New >Website > Under Templates, click ASP.NET WebSite and choose either Visual C# or Visual Basic as the language. Select a location and click Ok.
Step 2: We will create two excel sheets and add them to the project. One excel sheet will be created in Office 2003(.xls) and the other one using Office 2007(.xlsx or .xls) . Add 4 columns called EID, EName, Age and City to the ‘Sheet1’. Also add some data into the columns. Once these excel files are created, add them to your project. To add them to the project, right click project > Add Existing Item > Add the two excel files.
Step 3: We will now create a web.config file to store the connection string information. Right click project > Add New Item > Web.config. Add the following entries to the file.


<connectionStrings>
<add name="xls"connectionString="Provider=Microsoft.Jet.OLEDB.4.0;Data Source=Sample1.xls;Extended Properties=Excel 8.0"/>
<add name="xlsx"connectionString="Provider=Microsoft.ACE.OLEDB.12.0;Data Source=Sample.xlsx;Extended Properties=Excel 12.0"/>
As you can observe, the connection string for xlsx (Excel 2007) contains Microsoft.ACE.OLEDB.12.0 as the provider. This is the new Access database engine OLE DB driver and is also capable of reading Excel 2003.
Step 4: Add a GridView to the Default.aspx page. We will extract data from the excel file and bind it to the GridView.
Step 5: Let us now create a connection to the excel file and extract data from it. Before that add a reference to System.Data.OleDb;
C#
protected void Page_Load(object sender, EventArgs e)
{
string connString = ConfigurationManager.ConnectionStrings["xls"].ConnectionString;
// Create the connection object
OleDbConnection oledbConn = new OleDbConnection(connString);
try
{
// Open connection
oledbConn.Open();
// Create OleDbCommand object and select data from worksheet Sheet1
OleDbCommand cmd = new OleDbCommand("SELECT * FROM [Sheet1$]", oledbConn);
// Create new OleDbDataAdapter
OleDbDataAdapter oleda = new OleDbDataAdapter();
oleda.SelectCommand = cmd;
// Create a DataSet which will hold the data extracted from the worksheet.
DataSet ds = new DataSet();
// Fill the DataSet from the data extracted from the worksheet.
oleda.Fill(ds, "Employees");
// Bind the data to the GridView
GridView1.DataSource = ds.Tables[0].DefaultView;
GridView1.DataBind();
}
catch
{
}
finally
{
// Close connection
oledbConn.Close();
}
}
VB.NET
Protected Sub Page_Load(ByVal sender As Object, ByVal e As EventArgs)
Dim connString As String = ConfigurationManager.ConnectionStrings("xls").ConnectionString
' Create the connection object
Dim oledbConn As OleDbConnection = New OleDbConnection(connString)
Try
' Open connection
oledbConn.Open()
' Create OleDbCommand object and select data from worksheet Sheet1
Dim cmd As OleDbCommand = New OleDbCommand("SELECT * FROM [Sheet1$]", oledbConn)
' Create new OleDbDataAdapter
Dim oleda As OleDbDataAdapter = New OleDbDataAdapter()
oleda.SelectCommand = cmd
' Create a DataSet which will hold the data extracted from the worksheet.
Dim ds As DataSet = New DataSet()
' Fill the DataSet from the data extracted from the worksheet.
oleda.Fill(ds, "Employees")
' Bind the data to the GridView
GridView1.DataSource = ds.Tables(0).DefaultView
GridView1.DataBind()
Catch
Finally
' Close connection
oledbConn.Close()
End Try
End Sub
All set!! Run the application and see the data getting displayed in the GridView. If you want to target the Excel 2007 sheet, just change xls to xlsx in the ConfigurationManager.ConnectionString.
I hope this article was useful and I thank you for viewing it.
If you liked the article, Subscribe to my RSS Feed.
}
}


Thats it


5/1/09

Duplicate Count rows and Duplicate Delete Rows

Duplicate Count rows

----------------------------------------------------------------------------

we will see how to find count of all the duplicate records in the table. Following query demonstrates usage of GROUP BY, HAVING, ORDER BY in one query and returns the results with duplicate column and its count in descending order.

SELECT YourColumn, COUNT(*) TotalCount
FROM YourTable
GROUP BY YourColumn
HAVING COUNT(*) > 1
ORDER BY COUNT(*) DESC


----------------------------------------------------------------------------------

Duplicate Delete Rows


----------------------------------------------------------------------------------


The table must have identity column, which will be used to identify the duplicate records. Table in example is has ID as Identity Column and Columns which have duplicate data are DuplicateColumn1, DuplicateColumn2 and DuplicateColumn3.


DELETE
FROM
MyTable
WHERE ID NOT IN
(
SELECT MAX(ID)
FROM MyTable
GROUP BY DuplicateColumn1, DuplicateColumn2, DuplicateColumn2
)


---------------------------------------------------------------------------------------


Query to Retrieve the Nth Maximum value

-------------------------------------------------------------------------------------------------


How to get 1st, 2nd, 3rd, 4th, nth topmost salary from an Employee table

The following solution is for getting 6th highest salary from Employee table ,


SELECT TOP 1 salary
FROM (
SELECT DISTINCT TOP 6 salary
FROM employee
ORDER BY salary DESC) a
ORDER BY salary

You can change and use it for getting nth highest salary from Employee table as follows
SELECT TOP 1 salary
FROM (
SELECT DISTINCT TOP n salary
FROM employee
ORDER BY salary DESC) a
ORDER BY salary


where n > 1 (n is always greater than one)

Same example converted in SQL Server 2005 to work with Database AdventureWorks.

USE AdventureWorks;
GO
SELECT TOP 1 Rate
FROM (
SELECT DISTINCT TOP 4 Rate
FROM HumanResources.EmployeePayHistory
ORDER BY Rate DESC) A
ORDER BY Rate
GO


--------------------------------------------------------------------------------------------------

1/1/09

SQL SERVER - Query to find number Rows, Columns, ByteSize for each table in the current database - Find Biggest Table in Database

USE
GO
CREATE TABLE #temp (
table_name sysname ,
row_count INT,
reserved_size VARCHAR(50),
data_size VARCHAR(50),
index_size VARCHAR(50),
unused_size VARCHAR(50))
SET NOCOUNT ON
INSERT #temp
EXEC sp_msforeachtable 'sp_spaceused "?"'
SELECT a.table_name,
a.row_count,
COUNT(*) AS col_count,
a.data_size
FROM #temp a
INNER JOIN information_schema.columns b
ON a.table_name collate database_default
= b.table_name collate database_default
GROUP BY a.table_name, a.row_count, a.data_size
ORDER BY CAST(REPLACE(a.data_size, 'KB', '') AS integer) DESC
DROP TABLE #temp

SQL SERVER - Shrinking Truncate Log File - Log Full

SQL SERVER - Shrinking Truncate Log File - Log Full

December 30, 2006 by pinaldave

Sometime, it looks impossible to shrink the Truncated Log file. Following code always shrinks the Truncated Log File to minimum size possible.

USE DatabaseName
GO
DBCC SHRINKFILE(, 1)
BACKUP LOG WITH TRUNCATE_ONLY
DBCC SHRINKFILE(, 1)
GO

12/19/08

SQL SERVER - Delete Duplicate Records - Rows

Following code is useful to delete duplicate records. The table must have identity column, which will be used to identify the duplicate records. Table in example is has ID as Identity Column and Columns which have duplicate data are DuplicateValueColumn1, DuplicateValueColumn2 and DuplicateValueColumn3.

DELETE
FROM MyTable
WHERE ID NOT IN
(
SELECT MAX(ID)
FROM MyTable
GROUP BY DuplicatevalueColumn1, DuplicateValueColumn2,
DuplicateValueColumn2)


EXAMPLE
----------


if there is no key in the table then what ?

I have on table named [Duplicate] {ID int,FNAME varchar(10),MNAME varchar(10)}

Here there is no key and here are duplicate rows. so hoca can i delete this duplicate rows.

Check Data

ID FNAME LNAME
1 AAA CCC
2 BBB DDD
1 AAA CCC
2 BBB DDD
1 AAA CCC
2 BBB DDD
3 BCB DGD

Remove duplicate rows and keep the data in to the table like this using single query.

ID FNAME LNAME
1 AAA CCC
2 BBB DDD
3 BCB DGD

12/16/08

Asp.Net 2.0 Page Directives

Asp.Net Page directives are something that is a part of every asp.net pages. Page directives are instructions, inserted at the top of an ASP.NET page, to control the behavior of the asp.net pages. So it is type of mixed settings related to how a page should render and processed.

Here’s an example of the page directive.,
<%@ Page Language="C#" AutoEventWireup="true" CodeFile="Sample.aspx.cs" Inherits="Sample" Title="Sample Page Title" %>

Totally there are 11 types of Pages directives in Asp.Net 2.0. Some directives are very important without which we cannot develop any web applications in Asp.Net. Some directives are used occasionally according to its necessity. When used, directives can be located anywhere in an .aspx or .ascx file, though standard practice is to include them at the beginning of the file. Each directive can contain one or more attributes (paired with values) that are specific to that directive.


Asp.Net web form page framework supports the following directives

1. @Page
2. @Master
3. @Control
4. @Register
5. @Reference
6. @PreviousPageType
7. @OutputCache
8. @Import
9. @Implements
10. @Assembly
11. @MasterType


@Page Directive

The @Page directive enables you to specify attributes and values for an Asp.Net Page to be used when the page is parsed and compiled. Every .aspx files should include this @Page directive to execute. There are many attributes belong to this directive. We shall discuss some of the important attributes here.

a. AspCompat: When set to True, this allows to the page to be executed on a single-threaded apartment. If you want to use a component developed in VB 6.0, you can set this value to True. But setting this attribute to true can cause your page's performance to degrade.

b. Language: This attribute tells the compiler about the language being used in the code-behind. Values can represent any .NET-supported language, including Visual Basic, C#, or JScript .NET.

c. AutoEventWireup: For every page there is an automatic way to bind the events to methods in the same .aspx file or in code behind. The default value is true.

d. CodeFile: Specifies the code-behid file with which the page is associated.

e. Title: To set the page title other than what is specified in the master page.

f. Culture: Specifies the culture setting of the page. If you set to auto, enables the page to automatically detect the culture required for the page.

g. UICulture: Specifies the UI culture setting to use for the page. Supports any valid UI culture value.

h. ValidateRequest: Indicates whether request validation should occur. If set to true, request validation checks all input data against a hard-coded list of potentially dangerous values. If a match occurs, an HttpRequestValidationException Class is thrown. The default is true. This feature is enabled in the machine configuration file (Machine.config). You can disable it in your application configuration file (Web.config) or on the page by setting this attribute to false.

i. Theme: To specify the theme for the page. This is a new feature available in Asp.Net 2.0.

j. SmartNavigation: Indicates the smart navigation feature of the page. When set to True, this returns the postback to current position of the page. The default value is false.

k. MasterPageFile: Specify the location of the MasterPage file to be used with the current Asp.Net page.

l. EnableViewState: Indicates whether view state is maintained across page requests. true if view state is maintained; otherwise, false. The default is true.

m. ErrorPage: Specifies a target URL for redirection if an unhandled page exception occurs.

n. Inherits: Specifies a code-behind class for the page to inherit. This can be any class derived from the Page class.

There are also other attributes which are of seldom use such as Buffer, CodePage, ClassName, EnableSessionState, Debug, Description, EnableTheming, EnableViewStateMac, TraceMode, WarningLevel, etc. Here is an example of how a @Page directive looks

<%@ Page Language="C#" AutoEventWireup="true" CodeFile="Sample.aspx.cs" Inherits="Sample" Title="Sample Page Title" %>


@Master Directive

The @Master directive is quite similar to the @Page directive. The @Master directive belongs to Master Pages that is .master files. The master page will be used in conjunction of any number of content pages. So the content pages can the inherits the attributes of the master page. Even though, both @Page and @Master page directives are similar, the @Master directive has only fewer attributes as follows

a. Language: This attribute tells the compiler about the language being used in the code-behind. Values can represent any .NET-supported language, including Visual Basic, C#, or JScript .NET.

b. AutoEventWireup: For every page there is an automatic way to bind the events to methods in the same master file or in code behind. The default value is True.

c. CodeFile: Specifies the code-behid file with which the MasterPage is associated.

d. Title: Set the MasterPage Title.

e. MasterPageFile: Specifies the location of the MasterPage file to be used with the current MasterPage. This is called as Nested Master Page.

f. EnableViewState: Indicates whether view state is maintained across page requests. true if view state is maintained; otherwise, false. The default is true.

g. Inherits: Specifies a code-behind class for the page to inherit. This can be any class derived from the Page class.

Here is an example of how a @Master directive looks

<%@ Master Language="C#" AutoEventWireup="true" CodeFile="WebMaster.master.cs" Inherits="WebMaster" %>

@Control Directive

The @Control directive is used when we build an Asp.Net user controls. The @Control directive helps us to define the properties to be inherited by the user control. These values are assigned to the user control as the page is parsed and compiled. The attributes of @Control directives are

a. Language: This attribute tells the compiler about the language being used in the code-behind. Values can represent any .NET-supported language, including Visual Basic, C#, or JScript .NET.

b. AutoEventWireup: For every page there is an automatic way to bind the events to methods in the same .ascx file or in code behind. The default value is true.

c. CodeFile: Specifies the code-behid file with which the user control is associated.

d. EnableViewState: Indicates whether view state is maintained across page requests. true if view state is maintained; otherwise, false. The default is true.

e. Inherits: Specifies a code-behind class for the page to inherit. This can be any class derived from the Page class.

f. Debug: Indicates whether the page should be compiled with debug symbols.

g. Src: Points to the source file of the class used for the code behind of the user control.

The other attributes which are very rarely used is ClassName, CompilerOptions, ComplieWith, Description, EnableTheming, Explicit, LinePragmas, Strict and WarningLevel.

Here is an example of how a @Control directive looks

<%@ Control Language="C#" AutoEventWireup="true" CodeFile="MyControl.ascx.cs" Inherits=" MyControl " %>

@Register Directive

The @Register directive associates aliases with namespaces and class names for notation in custom server control syntax. When you drag and drop a user control onto your .aspx pages, the Visual Studio 2005 automatically creates an @Register directive at the top of the page. This register the user control on the page so that the control can be accessed on the .aspx page by a specific name.

The main atttribues of @Register directive are
a. Assembly: The assembly you are associatin with the TagPrefix.

b. Namespace: The namspace to relate with TagPrefix.

c. Src: The location of the user control.

d. TagName: The alias to relate to the class name.

e. TagPrefix: The alias to relate to the namespace.

Here is an example of how a @Register directive looks

<%@ Register Src="Yourusercontrol.ascx" TagName=" Yourusercontrol " TagPrefix="uc1" Src="~\usercontrol\usercontrol1.ascx" %>


@Reference Directive

The @Reference directive declares that another asp.net page or user control should be complied along with the current page or user control. The 2 attributes for @Reference direcive are

a. Control: User control that ASP.NET should dynamically compile and link to the current page at run time.

b. Page: The Web Forms page that ASP.NET should dynamically compile and link to the current page at run time.

c. VirutalPath: Specifies the location of the page or user control from which the active page will be referenced.

Here is an example of how a @Reference directive looks

<%@ Reference VirutalPath="YourReferencePage.ascx" %>


@PreviousPageType Directive

The @PreviousPageType is a new directive makes excellence in asp.net 2.0 pages. The concept of cross-page posting between Asp.Net pages is achieved by this directive. This directive is used to specify the page from which the cross-page posting initiates. This simple directive contains only two attibutes

a. TagName: Sets the name of the derived class from which the postback will occur.

b. VirutalPath: sets the location of the posting page from which the postback will occur.

Here is an example of @PreviousPageType directive


<%@ PreviousPageType VirtualPath="~/YourPreviousPageName.aspx" %>

@OutputCache Directive

The @OutputCache directive controls the output caching policies of the Asp.Net page or user control. You can even cache programmatically through code by using Visual Basic .NET or Visual C# .NET. The very important attributes for the @OutputCache directive are as follows

Duration: The duration of time in seconds that the page or user control is cached.

Location: To specify the location to store the output cache. To store the output cache on the browser client where the request originated set the value as ‘Client’. To store the output cache on any HTTP 1.1 cache-capable devices including the proxy servers and the client that made request, specify the Location as Downstream. To store the output cache on the Web server, mention the location as Server.

VaryByParam: List of strings used to vary the output cache, separated with semi-colon.

VaryByControl: List of strings used to vary the output cache of a user Control, separated with semi-colon.

VaryByCustom: String of values, specifies the custom output caching requirements.

VaryByHeader: List of HTTP headers used to vary the output cache, separated with semi-colon.

The other attribues which is rarely used are CacheProfile, DiskCacheable, NoStore, SqlDependency, etc.


<%@ OutputCache Duration="60" Location="Server" VaryByParam="None" %>


To turn off the output cache for an ASP.NET Web page at the client location and at the proxy location, set the Location attribute value to none, and then set the VaryByParam value to none in the @ OutputCache directive. Use the following code samples to turn off client and proxy caching.

<%@ OutputCache Location="None" VaryByParam="None" %>

@Import Directive

The @Import directive allows you to specify any namespaces to the imported to the Asp.Net pages or user controls. By importing, all the classes and interfaces of the namespace are made available to the page or user control. The example of the @Import directive

<%@ Import namespace=”System.Data” %>
<%@ Import namespace=”System.Data.SqlClient” %>


@Implements Directive

The @Implements directive gets the Asp.Net page to implement a specified .NET framework interface. The only single attribute is Interface, helps to specify the .NET Framework interface. When the Asp.Net page or user control implements an interface, it has direct access to all its events, methods and properties.


<%@ Implements Interface=”System.Web.UI.IValidator” %>

@Assembly Directive

The @Assembly directive is used to make your ASP.NET page aware of external components. This directive supports two attributes:

a. Name: Enables you specify the name of an assembly you want to attach to the page. Here you should mention the filename without the extension.

b. Src: represents the name of a source code file


<%@ Assembly Name="YourAssemblyName" %>

@MasterType Directive

To access members of a specific master page from a content page, you can create a strongly typed reference to the master page by creating a @MasterType directive. This directive supports of two attributes such as TypeName and VirtualPath.

a. TypeName: Sets the name of the derived class from which to get strongly typed references or members.

b. VirtualPath: Sets the location of the master page from which the strongly typed references and members will be retrieved.

If you have public properties defined in a Master Page that you'd like to access in a strongly-typed manner you can add the MasterType directive into a page as shown next


<%@ MasterType VirtualPath="MasterPage.master" %>

this.Master.HeaderText = "Label updated using MasterType directive with VirtualPath attribute";

10/23/08

Caching in Asp.net

* Introduction
* What is Caching ?
* Different Caching Location.
o Client Caching
o Proxy Caching
o Reverse Proxy Caching
o Web Server Caching
* Advantages and Disadvantages of Caching
* Caching Opportunity in ASP.NET
* Different Types of Caching
o Page Output Caching
o Fragment Caching
o Data Caching
+ Caching Dependency
# File Based Dependency
# Key Based Dependency
# Time Based Dependency
* Caching Considerations
o Output Caching Considerations
o Data Caching Consideration
* Suggested Uses of Caching Types


Introduction

In our last project we have developed a sites for a large number of user, Larger number of client means large number of request to your web server, heavy load on network, cause performance issue. For solving this problem I have worked on using of caching on our web application. Now I think why should not I write one article on Code project on it. I am writing this article that what ever I have learned from my Practical Experience, Net Surfing and Different Books for completing my assignment . Most of the thinks are very common to maximum of reader, but I have tried to write some different way that it can be understandable by all beginners also. Main interest that I have found while writing the article that setting up the different location for caching, I have also given the corresponding Visio Diagram also. Hope You will definitely like it.

What is Caching ?

Web applications are accessed by multiple users. A web site can have an extremely low load for minimum number of client access which provide faster access of the sites or may be heavy load on the site can increase exponentially which can slow down the server as well as access of Sites . Slow access is the most common problem for any web site when it is accessed by a large number of client simultaneously. For resolve this problem we can have used high level of hardware configuration, Load Balancer , High bandwidth but load is not the only reason that make a web site is slow , so we need to provide such kind of mechanism which also provide fast data access and provide performance improvement of web site. Caching provide the solution.

Caching is a technique where we can store frequently used data and Web pages are stored temporarily on local hard disks for later retrieval. This technique improves the access time when multiple users access a Web site simultaneously or a single user accesses a Web site multiple times. Caching for Web applications can occur on the client (browser caching), on a server between the client and the Web server (proxy caching / Reverse Proxy Caching), and on the Web server itself (page caching or data caching).

Maximum time we chose web server to store cached data though it improved the performance but it does not solve our purpose every time. If we consider about load on Web Server we have to consider about the location that when the cached data should store. Following section will describe on different location of storing cached data.

Different Caching Location

Caching in a web application can be done either on client side (Client Browser), In between Client and Server (Proxy & Reverse Proxy Caching ) and on Server Side( Data Caching/ Page Output Caching) . So we can classified caching location in 4 way

  1. Client Caching
  2. Proxy Caching
  3. Reverse Proxy Caching
  4. Web Server Caching

1. Client Caching : In Client Caching Client Browser perform caching by storing cached data on local disk as temporary file or browser internal memory. This provide quick access of some information by client which reduce the network load and server load also. This information can't be shared by other clients so it is client specific.

client_caching.jpg

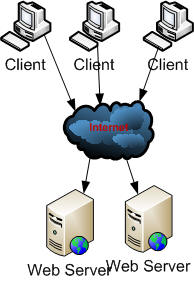
Fig 1.0 : Client Caching

Advantages

  1. Data that are cached on local client can be easily accessed
  2. Reduce Network Traffic

Disadvantages

  1. Cached data are totally browser dependent, so it is not shareable

2. Proxy Caching : Main disadvantage of Client caching was data that are store on client browser are client specific. Proxy Caching technique used a dedicated server that store caching information in between client and web server in a shared location, that all client can used same shared data. The proxy server (e.g. Microsoft Proxy Server ) fulfills all the requests for the Web page without sending out the request to the actual Web server over the Internet, resulting in faster access.

proxy_caching.jpg

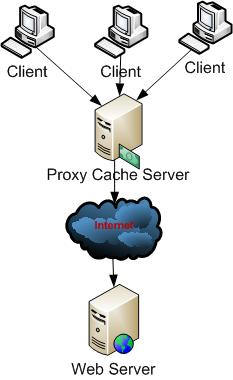
Fig 1.0 : Proxy Caching

Proxy caches are often located near network gateways to reduce the bandwidth . Some times Multiple Proxy Cache server is used for larger number of client. This is called Cache Array.

cache_array.jpg

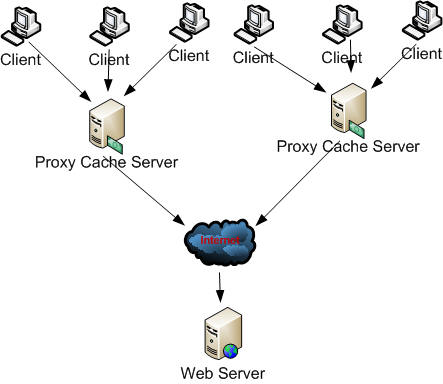
Fig 1.1 : Cache Array

Advantages

  1. Data that are cached on proxy server can a accessed easily
  2. Reduce Network Traffic

Disadvantages

  1. It a Deployment and Infrastructure overhead to maintain a Proxy Cache Server

3. Reverse Proxy Caching : Some Proxy Cache server can placed in front of web server to reduce the number of requests that they receive. This allows the proxy server to respond to the frequently received requests and pass the other requests to the Web server. This is called a reverse proxy.

Reverse_Proxy_Caching.jpg

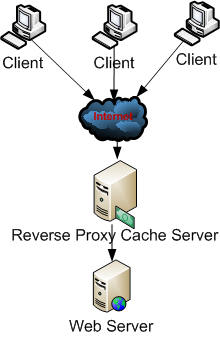
Fig 1.2 : Reverse Proxy Caching

Advantages

  1. Data that are cached on reverse proxy server can a accessed easily
  2. Web server reduce the number of request

Disadvantages

  1. As the Server configured in front of Web sever some what it increases the network traffic.

4. Web Server Caching : In Web server caching cached data stored inside the web server, Data caching and page caching used web sever caching mechanism.

Web_Server_Caching.jpg

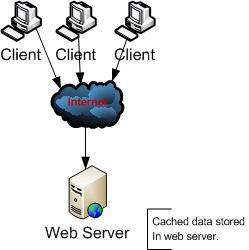
Fig 1.3 : Web Server Caching

Advantages

  1. Improve the performance of sites by decreasing the round trip of data retrieving from database or some other server

Disadvantages

  1. Increase the Network Load

Advantages and Disadvantages Of Caching

Advantages

  1. Reduced server load
  2. Reduced bandwidth consumption

Caching Opportunity in ASP.NET

ASP.NET provides support for page, partial page (Fragment), and data caching. Caching a page that is dynamically generated, called page output caching . In page caching when a pages is cached that dynamically generated only the first time it is accessed. Any subsequent access to the same page will be returned from the cache.. ASP.NET also allow to Cached a portion of a page called Partial page caching or Fragment Caching . Other server data are cached (e.g. SQL Server data, XML Data ) that can be easily accessed with out re-retrieving that data using data Caching . caching reduce number of round trip of database and other data source. ASP.NET provides a full-featured data cache engine, complete with support for scavenging (based on cache priority) , expiration, and file and key , Time dependencies . There are two locations where caching can be used to improve performance in ASP.NET applications.

Caching_Opportunity_in_ASP.NET.jpg

Fig 1.4 : Caching Opportunity in ASP.NET

In above picture (1) is used for return caching of page that means its used in output caching and (2) save the round trip by storing the data using data caching.

ASP.NET supports two types of expiration policies, which determine when an object will be expired or removed from the cache. These two policies are described as follows:

Absolute expiration: Determines that the expirations occur at a specified time. Absolute expirations are specified in full-time format (hh:mm:ss). The object will be expired from the cache at the specified time.

ASP.NET Supports Three Type of Caching

  1. Page Output caching [Output caching ]
  2. Fragment caching [Output caching ]
  3. Data Caching

Different Types of Caching

1 . Page Output Caching : Before starting Page Output caching we need to know the compilation process of a page, because based on the generation of page we should able to understand why should we used caching . ASPX Page compiled in two stage process. First, the code is compiled into the Microsoft Intermediate Language (MSIL). Then, the MSIL is compiled into native code (by JIT Compiler ) during execution. and entire code in an ASP.NET Web page is compiled into MSIL when we built the sites , but at the time of execution only the portion of MSIL Converted to native code which is need by user or user request, which also improve performance.

Page_Execution.jpg

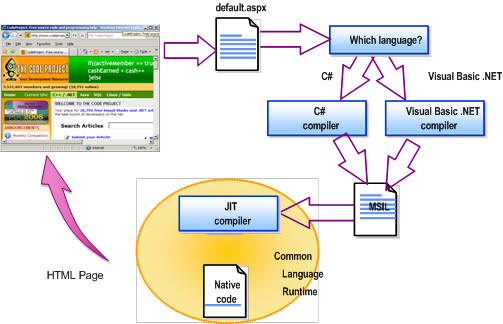
Fig 1.5 : ASP.NET Page Execution Process

Now what ever we are getting , if there is some page which change frequently JIT need compile every time. So, We can use Page output for those page which content are relatively static. So rather than generating the page on each user request we can cached the page using Page output caching so that it can be access from cache itself. so, Instead of pages can be generated once and then cached for subsequent fetches.Page output caching allows the entire content of a given page to be stored in the cache.

Page_Output_caching.jpg

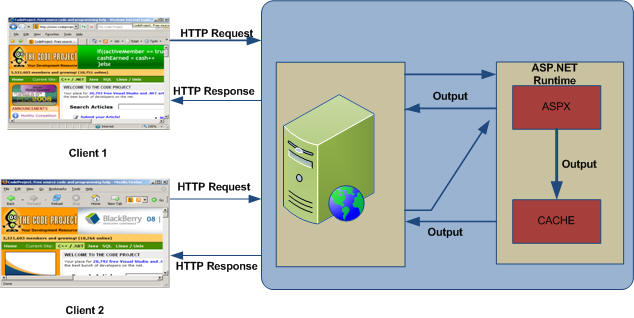
Fig 1.5 : Page Output Caching

As from given picture, when the first request is generated page is been cached and for same page request page should be retrieve from cache itself rather that regenerating the page.

For Output caching , OutputCache directive can be added to any ASP.NET page, specifying the duration (in seconds) that the page should be cached. The code.

Example

<%@ Page Language="C#" %>

<%@ OutputCache Duration='300' VaryByParam='none' %>
<html>

<script runat="server">
protected void Page_Load(Object sender, EventArgs e) {
lbl_msg.Text = DateTime.Now.ToString();
}
script>

<body>
<h3>Output Cache example</h3>
<p>Page generated on:
<asp:label id="lbl_msg" runat="server"/></p>
</body>
</html>

We also set Caching property from Codebehind also
void Page_Load(Object sender, EventArgs e) {

Response.Cache.SetExpires(DateTime.Now.AddSeconds(360));
Response.Cache.SetCacheability(
HttpCacheability.Public);
Response.Cache.SetSlidingExpiration(true);
_msg.Text = DateTime.Now.ToString();
}

We have to have mention the Duration and VaryByParam attributes. Duration Define how long time cache will persist. VaryByParam is meant for is there any change with parameter for cache.

Varyparam_Cached.jpg

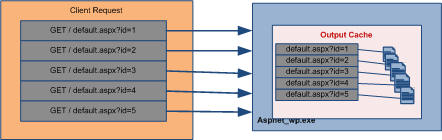
Fig 1.6 : Caching multiple page based on parameters

As above picture shown , if we are using query string for page and we need to cached all the page based on the query string, we have to use VaryByParam attributes of outputcache. Based on every query string data should be cached, and when user request page among those query string (id in picture) page should be fetched from cached. Following example describe the detsils use of VaryByParam Attributes.

Example:

<%@ OutputCache Duration="60" VaryByParam="*" %>

page would cached for 60 seconds, and would create a separate cache entry for every variation of querystring

Following table shown you the most commonly used and most important attributes of outputcache:

Attribute Values Description
Duration Number Define how long page will be cached (in seconds)
Location 'Any'

'Client'

'Downstream'

'Server'

'None'

It define the page cached location. I have discussed it later in details
VaryByCustom 'Browser' Vary the output cache either by browser name and version or by a custom string,
VaryByParam 'none' '*' This is a required attribute, which is required for parameter for the page. This I have already discussed.

All the attributes that we specify in an OutputCache directive are used to populate an instance of the System.Web.HttpCachePolicy class by calling. The complete implementation of cache policies provided by ASP.NET is encapsulated in the HttpCachePolicy class. Following is the another implementation of caching from code behind.

Output Caching Location

As I have already mention We can store cached data in different location like client, server or in between client and server , Now I am going to discuss how this is feasible to set location of cached data. If we store the cached data it save the page rendering time by fetching the data from catch. There is another way that we can save cached data on client browser , which reduce the network traffic. OutputCache directive on a page enables all three types of caching—server, client, and proxy—by default.

Following Table shown you the Location details . It show the location of cached and what should be the effects on Cache-Control and Expires Header.

Value of Location Cache-Control Header Expires Header Page Cached on Server Description
'Any' public Yes Yes Page can be cached on the browser client, a downstream server, or the server
'Client' private Yes No Page will be cached on the client browser only.
'Downstream' public Yes No Page will be cached on a downstream server and the client
'Server' no-cache No Yes Page will be cached on the server only.
'None' no-cache No No Disables output caching for this page.

For example, if you specified a value of 'Client' for the Location attribute of an OutputCache directive on a page, the page would not be saved in the server cache, but the response would include a Cache-Control header ( Pages can indicate whether they should be cached on a proxy by using the Cache-Control header.) value of private and an Expires header (HTTP response, indicating the date and time after which the page should be retrieved from the server again ) with a timestamp set to the time indicated by the Duration attribute

Example

<%@ OutputCache Duration='120' Location='Client'      VaryByParam='none' %>

This would save the cached for 120 second and cached data should not be saved on Server it should store only on client browser.

2 . Page Fragment Caching : ASP.NET provides a mechanism for caching portions of pages, called page fragment caching. To cache a portion of a page, you must first encapsulate the portion of the page you want to cache into a user control. In the user control source file, add an OutputCache directive specifying the Duration and VaryByParam attributes. When that user control is loaded into a page at runtime, it is cached, and all subsequent pages that reference that same user control will retrieve it from the cache.

Fragment_Cached.jpg

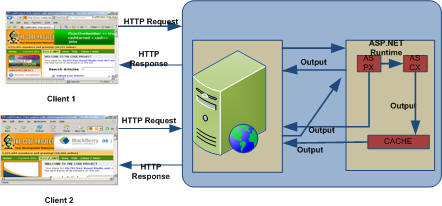
Fig 1.7 : Fragment Caching

Following Example shown you details of Fragment caching

Example

<!— UserControl.ascx —>


<%@ OutputCache Duration='60'
VaryByParam='none' %>
<%@ Control Language="'C#'" %>

<script runat="server">
protected void Page_Load(Object src, EventArgs e)
{
_date.Text = "User control generated at " +
DateTime.Now.ToString();
}
</script>
<asp:Label id='_date' runat="'server'" />

Here I have user caching on user control, so when ever we used in a page , only partial page will be cached.

3. Data Caching : Caching of data can dramatically improve the performance of an application by reducing database contention and round-trips. Simply data caching store the required data in cache so that web server did not send request to DB server every time for each and every request which increase the web site performance. For data caching we need to cached those data which is accessible to all or which is very common data. The data cache is a full-featured cache engine that enables you to store and retrieve data between multiple HTTP requests and multiple sessions within the same application .

datacaching.png

Fig 1.8 : Data Caching

Above image showing how data can be accessed directly from data base server and how data retrieving using cache. Data caching is not only related with SQL Server, we can store other data source data (as shown on Fig 1.4).

Now let see, how we can implement data caching in our web application. There are Three Different way to add data or object into cache. But based upon the situation we have to access it. These methods are Cache[], Cache.add(), cache.insert(). The following table will show you the clear difference of there methods.


Stored data in cache

Support Depedency

Support Expiration

Support Priority Settings

Return Object

cache[] Yes No No No No
cache.insert() Yes Yes Yes Yes No
cache.add() Yes Yes Yes Yes Yes

As we are getting, cache[] is property that is very simple to use but cache.insert() and cache.add() are having some more property which give us more control on cached data.

Now we should look into details of Cache.Insert() and Cache.Add() methods. Cache.Insert() having 4 overloaded method where as Cache.Add() having no overloaded methods. Following table are showing are most commonly used important property for those methods.

Property Type Description
Key String A unique key used to identify this entry in the cache
Dependency CacheDependency A dependency this cache entry has—either on a file, a directory, or another cache entry—that, when changed, should cause this entry to be flushed
Expires DateTime A fixed date and time after which this cache entry should be flushed
Sliding Expiration TimeSpan The time between when the object was last accessed and when the object should be flushed from the cache
Priority CacheItemPriority How important this item is to keep in the cache compared with other cache entries (used when deciding how to remove cache objects during scavenging)
OnRemoveCallback CacheItem RemovedCallback A delegate that can be registered with a cache entry for invocation upon removal


Cache.Insert() Method

[Cache.Insert() Code Example]

First two are the mandatory for Cache.Insert() methods, whereas others vary based on the situation.

Caching Depedency

Using Cache dependency we can set the dependency of the catch with some data or entity to changed. So we can set the depedency of cache by which we can update, remove cache. There are three types of dependencies supported in ASP.NET.

  • File based Dependency
  • Key Based Dependency
  • Time Based Dependency

File Based Dependency : File-based dependency invalidates a particular Cache item when a file(s) on the disk changes.

Using cache dependency we can force ASP.NET to expire the cached data item from the cache when the dependency file changes. We can set Dependency to multiple file also . on such case dependency should be built from an array of files or directories.

Use : File based dependency is very use full when need to update some data that displaing to the user based on some changed on file. As for Example, a New Sites always shows data from a file , now if some breaking news come, they just update the file and cached should expire and during the expire time we can reload the cache with updated data using OnRemoveCallBack

Key Based Dependency : Key-based dependency invalidates a particular cache item when another cache item changes.

Use : This is use full when we have multiple interrelated object are in cache and if one of the object changed we need to updated or expire all of them, Key Based Dependency will be best option

Time Based Dependency : Time-based dependency causes an item to expire at a defined time. Cache.Insert() method of the Cache class is used to create a time-based dependency. Two Types of Time based Dependency are available.

  • Absolute
  • Sliding

Absolute: Sets an absolute time for a cache item to expire. Absolute expirations are specified in full-time format (hh:mm:ss). The object will be expired from the cache at the specified time.

Sliding: Resets the time for the item in the Cache to expire on each request. This is useful when an item in the cache is to be kept alive so long as requests for that item are coming in from various clients.

With those dependency ASP.NET also support

In addition to the dependencies, ASP.NET allows the following:

Automatic expiration: The cache items that are underused and have no dependencies are automatically expired.

Support for callback: The Cache object can be configured to call a given piece of code that will be executed when an item is removed from the cache. This gives you an opportunity to update the cache. We can use OnRemoveCallback().

Caching Considerations

Output Caching Considerations
    1. Enable output caching on a page that is frequently accessed and returns the exact same contents for many of those accesses

    2. When enabling output caching for a page, be sure not to introduce incorrect behavior and/or rendering for any particular client.

    3. Determine the duration of the cached page carefully to balance speed of access (throughput) with memory consumption and cache coherency correctness.

    4. Consider enabling sliding expiration on a page if you end up using VaryByParam='*'.

Data Caching Consideration
    1. The data cache is not a container for shared updateable state.

    2. Cache data that is accessed frequently and is relatively expensive to acquire.

    3. If data is dependent on a file, directory, or other cache entry, use a CacheDependency to be sure it remains current.

Suggested Uses of Caching Types

Situation Suggested Caching Type

The generated page generally stays the same, but there are several tables shown within the output that change regularly.

Use Fragment Caching in this situation.

The generated page constantly changes, but there are a few objects that don’t change very often.

Use Data Caching for the objects.

The generated page changes every few hours as information is loaded into a database through automated processes.

Use Output Caching and set the duration to match the frequency of the data changes.


Welcome